# Form properties

Tab **Properties** allows configuration of parameters related to the behavior, appearance, and interaction of the form during its operation.\
These parameters affect how the form is presented to the user, how it communicates with services, and which interface elements are visible. Properties are grouped into thematic sections.

![Figure 1. Appearance of the "Properties" tab](/files/2181b7409d555c4770800138008f3e7d4a56a6c9)

## **Section "General"**

### **Request description**

A text field that allows you to add a short description or comment to the form project. This description is not shown to the end user, but it makes identification in the repository and in team work easier.

### **Entry services**

This section contains a list of services that are attached to the request as startup services. These services will start at the beginning of the request lifecycle, if the activity condition is met. Entry services are executed sequentially, according to their order in the list. In edit mode, it is possible to add and remove an entry service and define the service launch condition.

<figure><img src="/files/f0ac54bdb7a229e75993f4ce489c565bd3180226" alt=""><figcaption><p><em><strong>Figure 2.</strong> Section "Entry services" with added services</em></p></figcaption></figure>

### **Input parameter mapping services**

{% hint style="info" %}
Availability of the functionality depends on the license and may not be available in all deployments.
{% endhint %}

A section **Input parameter mapping services** allows connecting services whose task is to **populate form fields** with data before it is launched.\
These services are started automatically **when entering the request** - both when opening the form normally and when it is **unparked** (session resumed).

Thanks to these services, for example, customer data can be passed from an external system, initial field values can be set, or the request can be opened on a specific page.

#### **Characteristic features of mapping services**

* do not have **output parameters**,
* the result of the service is **directly mapped to form fields or session variables**,
* can specify the page on which the form should open,
* are executed **always first** - even before entry services.

#### Implementation example (ServiceProxy)

To populate a field, the service should return in the map a key that will have the field identifier on the request and a value that will be assigned to it. Do not define **outputFields** for fields returned from the callService() method. To open the request on a specific page, pass the variable ***recentlyRequestedPageMid*** to the output map and pass the mid of the appropriate page to it.

{% code expandable="true" %}

```java
@Component
@Service(AbstractServiceProxy.class)
public class DemoMappingEntryService extends AbstractServiceProxy {

    private final static String TEXT_FIELD = "GesComplexComponent1.GesTextField1";
    private final static String PAGE_MID = "_recentlyRequestedPageMid";

    public DemoMappingEntryService() {
        this.name = "DemoMappingEntryService";
        this.description = "For test purposes ONLY!";
    }

    @Override
    public List<Map<String, String>> callService(Map<String, List<String>> map)
            throws ServiceProxyException {
        return Collections.singletonList(ImmutableMap.of(
                TEXT_FIELD, "Value passed from the DemoMappingEntryService service",
                PAGE_MID, "Page2"));
    }
}

```

{% endcode %}

{% hint style="info" %}
Demo request: demoSerwisMapujacyParametryWejscia
{% endhint %}

### **Output services**

This section contains a list of services that are attached to the request as end services. These services will start before the end of the request lifecycle, if the activity condition is met.

### **Statistics**

This section contains options related to collecting statistics from the request. For each request, it is possible to specify which statistics should be collected and how often.

#### External statistics

Additionally, in the Statistics section, you can enable sending Google Tag Manager statistics. You can read about the functionality itself in the GTM documentation: [GTM statistics](/documentation/documentation-en/budowanie-aplikacji/interfejs-uzytkownika/formularze/tworzenie-formularza/statystyki-gtm.md).

## **Section "Appearance"**

This section is responsible for configuring interface elements visible while the request is being filled in.

### **Side and bottom panel**

{% hint style="info" %}
Availability of the functionality depends on the license and may not be available in all deployments.
{% endhint %}

Allows you to enable or disable the visibility of additional panels (e.g. a side menu with information, notifications, or content blocks). Panels can be used to present useful links or cross-sell elements.

Artifacts of type can be attached to the panels [Content (TextContent)](https://github.com/Consdata/eximee-docs/blob/main/budowanie-aplikacji/interfejs-uzytkownika/formularze/biblioteka-komponentow-bazowych/tresc-textcontent/README.md), selected from the repository. Editing the panel (adding a visibility condition, listeners, styles, or choosing a slot) requires clicking the pencil icon, and saving the changes requires clicking the save symbol. The placement of the added content is determined by the **Slot**. Panels allow you to define multiple pieces of content that will be displayed one below another.

<figure><img src="/files/9c1396c8ce930d493d8e2888caa3196f65e2a625" alt=""><figcaption><p><em><strong>Figure 3</strong></em><strong>.</strong> <em>Side and bottom panel - example of defining content</em></p></figcaption></figure>

<figure><img src="/files/708a9376d7c843596bd132488afe0f0725f62b94" alt=""><figcaption><p><em><strong>Figure 4.</strong> Example appearance of the side panel on the request</em></p></figcaption></figure>

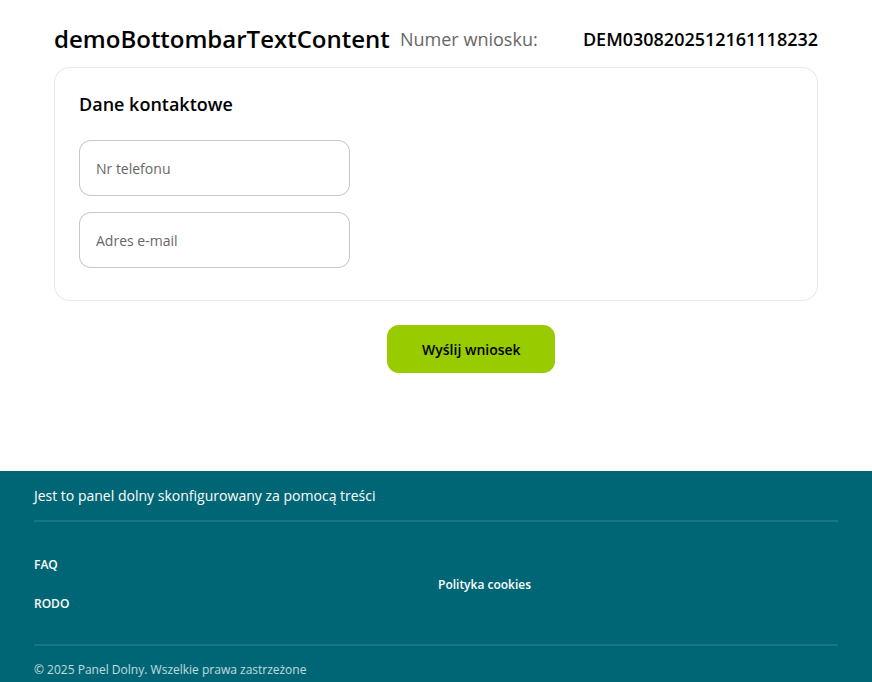
The content of the bottom panel is determined by setting the Slot option to the appropriate value, which depends on the implementation.

<figure><img src="/files/aa1bfa4439886300a5f16ba9afc658f7ba3a2760" alt=""><figcaption><p><em><strong>Figure 5</strong></em><strong>.</strong> <em>Example appearance of the bottom panel on the request</em></p></figcaption></figure>

### **Step visibility**

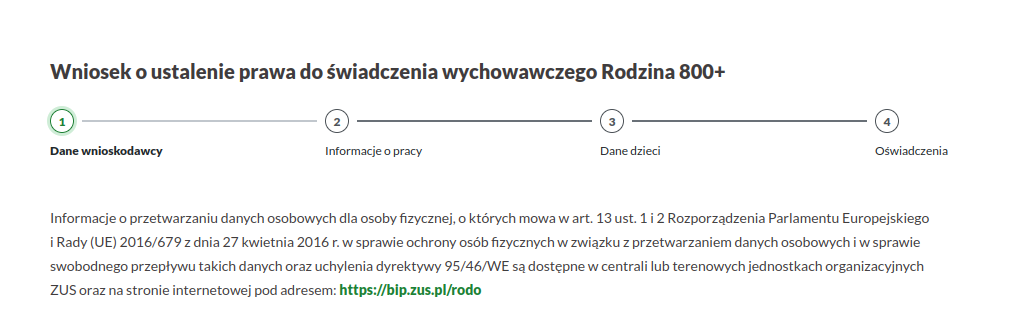
Controls the display of the upper horizontal progress bar (the so-called [form steps](/documentation/documentation-en/budowanie-aplikacji/interfejs-uzytkownika/formularze/tworzenie-formularza/kroki-i-strony-formularza.md)). Hiding it can be used in one-page requests or simplified processes.

In this section, you can define the visibility condition of the steps bar and indicate the elements that trigger this change (so-called element listening).

<figure><img src="/files/987e39626616fa18c3c60c47418ea14c515a8634" alt=""><figcaption><p><em><strong>Figure 6</strong></em><strong>.</strong> <em>Example of a defined condition</em> <em>of steps bar visibility</em></p></figcaption></figure>

<figure><img src="/files/e8e2e01b9a06c158e0dc662a9591764ac105276e" alt=""><figcaption><p><em><strong>Figure 7</strong></em><strong>.</strong> <em>Example steps on the request</em></p></figcaption></figure>

### **Visibility of the navigation bar/button**

**Visibility of the navigation bar** allows you to specify whether the bottom navigation bar (with Back/Next/Send buttons) should be visible. In the section **Visibility of the navigation button** only the condition for showing the Next/Send button is specified. In both sections, remember to indicate the elements that trigger the change (so-called listening).

<figure><img src="/files/f14d50a3e044ddfaa4963831b23d5fa235fdd159" alt=""><figcaption><p><em><strong>Figure 8.</strong></em> <em>A section</em> "<em>Visibility of the navigation button"</em></p></figcaption></figure>

{% hint style="warning" %}
The currentPageId variable is not supported. For correct operation of navigation button visibility, the currentPageMid variable should be used
{% endhint %}

### **Visibility of an additional header element**

{% hint style="info" %}
Availability of the functionality depends on the license and may not be available in all deployments.
{% endhint %}

Allows displaying an additional element in the first position of the page header (e.g. an icon, a button propagating an action). The type of displayed element may vary depending on the implementation and its occurrence is not guaranteed in all implementations.

### **Bottom Bar**

{% hint style="info" %}
Availability of the functionality depends on the license and may not be available in all deployments.
{% endhint %}

Determines whether the form footer should be shown to the user. It can be conditionally hidden - e.g. on information or summary pages.

### **Panic Button (FAB)**

{% hint style="info" %}
Availability of the functionality depends on the license and may not be available in all deployments.
{% endhint %}

Specifies whether the floating button on the request page, which opens an additional window (FAB - *Floating Action Button*) should be visible on the form.

#### **Visibility**

The visibility of the button is set in the sub-section **Visibility**, where the condition for showing the button and the element that should trigger this change are defined (*listening*). Thanks to this, the button can be visible only in specific situations, e.g. after checking a box or in a given request step.

#### **Phone number masking**

In the **Masking** section, you can define whether the phone number in the button window should be masked (e.g. partially hidden). The visibility of the number is determined by a condition and listening to the element triggering the change.

#### **Additional settings**

In the sub-section **Additional data** you can indicate form components whose values will be passed to the button configuration - phone number, id, or configuration version. This option is available only in selected implementations.

<figure><img src="/files/88d43a374260bbb00f1891063709b287a653a5c8" alt=""><figcaption><p><em><strong>Figure 9</strong></em><strong>.</strong> <em>Visibility of the "Panic Button" section with set conditions and parameters</em></p></figcaption></figure>

#### **Technical configuration**

The size and position of the browser window, as well as the website address it leads to, are defined for a given installation in the webforms.xml configuration file. Example values:

```xml
<floatingActionButton>
    <windowPositionX>100</windowPositionX>
    <windowPositionY>100</windowPositionY>
    <windowSizeX>100</windowSizeX>
    <windowSizeY>100</windowSizeY>
    <actionLink>http://consdata.pl</actionLink>
</floatingActionButton>
```

**Configuration parameters:**

* *windowPositionX* – distance of the window from the left edge (px)
* *windowPositionY* – distance of the window from the top (px)
* *windowSizeX* – window width (px)
* *windowSizeY* – window height (px)
* *actionLink* – address of the website opened in a new window; it may contain form variables available when the request starts, e.g.:

```
<actionLink>http://consdata.pl?nazwawniosku=${formId}&numerwniosku=${formInstanceNumber}</actionLink>
```

#### **Translations and text keys**

The labels on the component can be customized by adding translations in the main form template:

<table><thead><tr><th width="423">Translation key</th><th>Description</th><th>Default content</th></tr></thead><tbody><tr><td><code>iew.fab.need.help</code></td><td>title in the startup popup</td><td>"Need help?"</td></tr><tr><td><code>iew.fab.well.call.up</code></td><td>description in the startup popup</td><td>"We will call you back as soon as possible..."</td></tr><tr><td><code>iew.fab.order.call</code></td><td>button text in the startup popup</td><td>"Order contact"</td></tr><tr><td><code>iew.fab.thank.you.title</code></td><td>title in the thank-you popup</td><td>"We will call you back soon"</td></tr><tr><td><code>iew.fab.thank.you.desc</code></td><td>description in the thank-you popup</td><td><em>""</em></td></tr><tr><td><code>iew.fab.error.could.not.order.conversation.title</code></td><td>title in the error popup</td><td>"Unable to order a call"</td></tr><tr><td><code>iew.fab.error.try.again.desc</code></td><td>description in the error popup</td><td>"Try again in a moment"</td></tr></tbody></table>

{% hint style="info" %}
Demo requests: demoFab, demoFabZmienioneLitera
{% endhint %}

### **Loading progress style**

Defines how the loading indicator is presented during form initialization. The default value is "preloader". Available styles may vary depending on the graphic theme (e.g. progress bar, spinner, logo animation).

### **Conditional request titles**

Allows defining different titles displayed in the form header depending on whether specific conditions are met. Each title has an assigned **visibility condition** (e.g. data-dependent), which makes it possible to dynamically change the header depending on the request stage or user role.

#### **Title definition**

Each title definition is presented in a separate table row. A given row contains:

* **Title key** – translation identifier or fixed text displayed in the form header,
* **Visibility condition** – logical expression determining when the title should be used,
* **Elements triggering change (listening)** – list of components or variables (separated by commas) whose change causes the condition to be re-evaluated,
* **Edit and delete buttons** – allow modifying or deleting the title definition row,
* **Save button** – visible while editing a row; saves the entered changes,
* **Handle for reordering** – allows dragging the title and setting its priority (order of condition checking).

{% hint style="info" %}
Rows are processed **from top to bottom**, so if several conditions are met, the title from the highest row will be displayed.
{% endhint %}

<figure><img src="/files/c269ece346c9ff5f3e67ddaa2d81a2ba03c3e3aa" alt=""><figcaption><p><em><strong>Figure 10.</strong> Example of four defined conditional titles</em></p></figcaption></figure>

{% hint style="warning" %}
If the change of the request title depends on moving between pages, then in the condition we use the variable *currentPageMid*. This will allow the title to change both when moving to the next page and when going back.
{% endhint %}

{% hint style="info" %}
Demo request: demoFormTitles
{% endhint %}

{% hint style="info" %}
Demo request: demoWlasciwosciSzablonuWniosku
{% endhint %}


---

# Agent Instructions: Querying This Documentation

If you need additional information that is not directly available in this page, you can query the documentation dynamically by asking a question.

Perform an HTTP GET request on the current page URL with the `ask` query parameter:

```
GET https://docs.eximee.com/documentation/documentation-en/budowanie-aplikacji/interfejs-uzytkownika/formularze/tworzenie-formularza/wlasciwosci-formularza.md?ask=<question>
```

The question should be specific, self-contained, and written in natural language.
The response will contain a direct answer to the question and relevant excerpts and sources from the documentation.

Use this mechanism when the answer is not explicitly present in the current page, you need clarification or additional context, or you want to retrieve related documentation sections.